Promoting a Release
Once you have created a release within ampsuite you can easily send it to your press contacts or promo-pool using the Promotions tool.
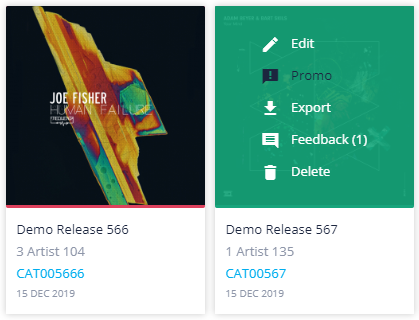
To create a new promotion go to the 'View Releases' page from the blue menu, hover over the release you wish to promo and click on the 'Promo' link as shown in the screenshot below.
Note: You will need to set up your Contacts / Contact Lists before you can send your first promotion - see the Contacts and Contact Lists sections of the help guide on how to do this.
Setting up Your Promotion
After selecting the release you wish to promo you will be taken to the Promo Details screen as shown below.
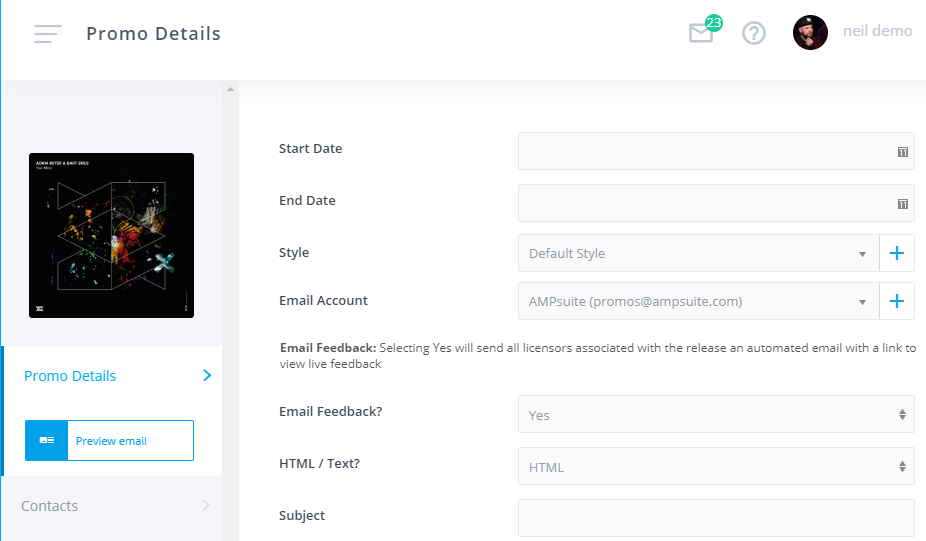
The first tab 'Promo Details' you will see open upon first loading the screen, allows you to enter the basic details of the promotion.
- Start Date - The date the promo email will be sent to contacts, if you select todays date it will be sent immediately - if you select a future date it will be queued until then. Queued promos generally go out around 6PM GMT on the date selected - if you wish to have a different default time for your system please contact your ampsuite representative.
- End Date - Contacts will be unable to access the promo / downloads after this date - and will instead see a message informing them the promo has expired.
- Style - You can choose from a number of predefined email templates and customise them to your liking. Templates you have previously saved will be shown in the dropdown, or you can create a new style template by clicking the + button to the right of the dropdown. To find out more information on creating styles see the Promo Styles section of the help guide.
-
Email Account - You can either use ampsuites own mail server to deliver your promos (they will be sent from promos@ampsuite.com) or set up the system to use your own SMTP server if you would rather they come from your own address. See the section on setting up your own SMTP account at the bottom of this page for more details.
NOTE: Some email providers (e.g. gmail) limit the number of emails you can send, and this may have an impact on the number of promo mailouts you can send in a day when using your own SMTP server. - Email Feedback? - If you select 'Yes' all licensors associated with the release will receive an automated email with a link to view feedback for the promo. This is a live view which will update as more feedback is left.
- HTML / Text - It's possible to send a pure text version of the promo mailout, rather than using one of the html templates. We have found that text based emails tend to have less chance of hitting people's spam folder and can lead to higher feedback rates. They also allow you to use a number of 'tags' to personalise the email, for example by including the contacts first name, if this information has been entered into ampsuite.
-
Subject - The subject of the email as it will be shown in people's inboxes.
TIP: Avoid using words such as 'Promo' or 'Free' in the subject line, as this can increase the chance of emails being marked as spam. -
Message - For HTML emails this text will appear above the release description, you can leave it blank if you are happy just to chose the release description. For Text emails this is the main body of the email. For text emails you can also use the tags @first_name, @dj_name to personalise the email if these details have been entered in to ampsuite for the contacts. You can use the @promo_link tag to decide where to place the link the user clicks to view the download / feedback page - if you do not include this tag the link will appear at the end of the email by default.
NOTE: Do not use any of the above tags if using the HTML template version of the email, as they will not work.
Selecting Contacts
Before you can send out your promo email you need to select which contacts you wish to send it to. To do this click on the Contacts tab in the grey column to the left of the screen (underneath Promo Details).
Note: You will need to set up your Contacts / Contact Lists before you can send your first promotion - see the Contacts and Contact Lists sections of the help guide on how to do this.
Click the Edit Contacts button as shown in the video below - you will see a list of all of your contacts and contact lists appears on the right hand side of the screen - they are listed together, with the contact lists appearing at the top.
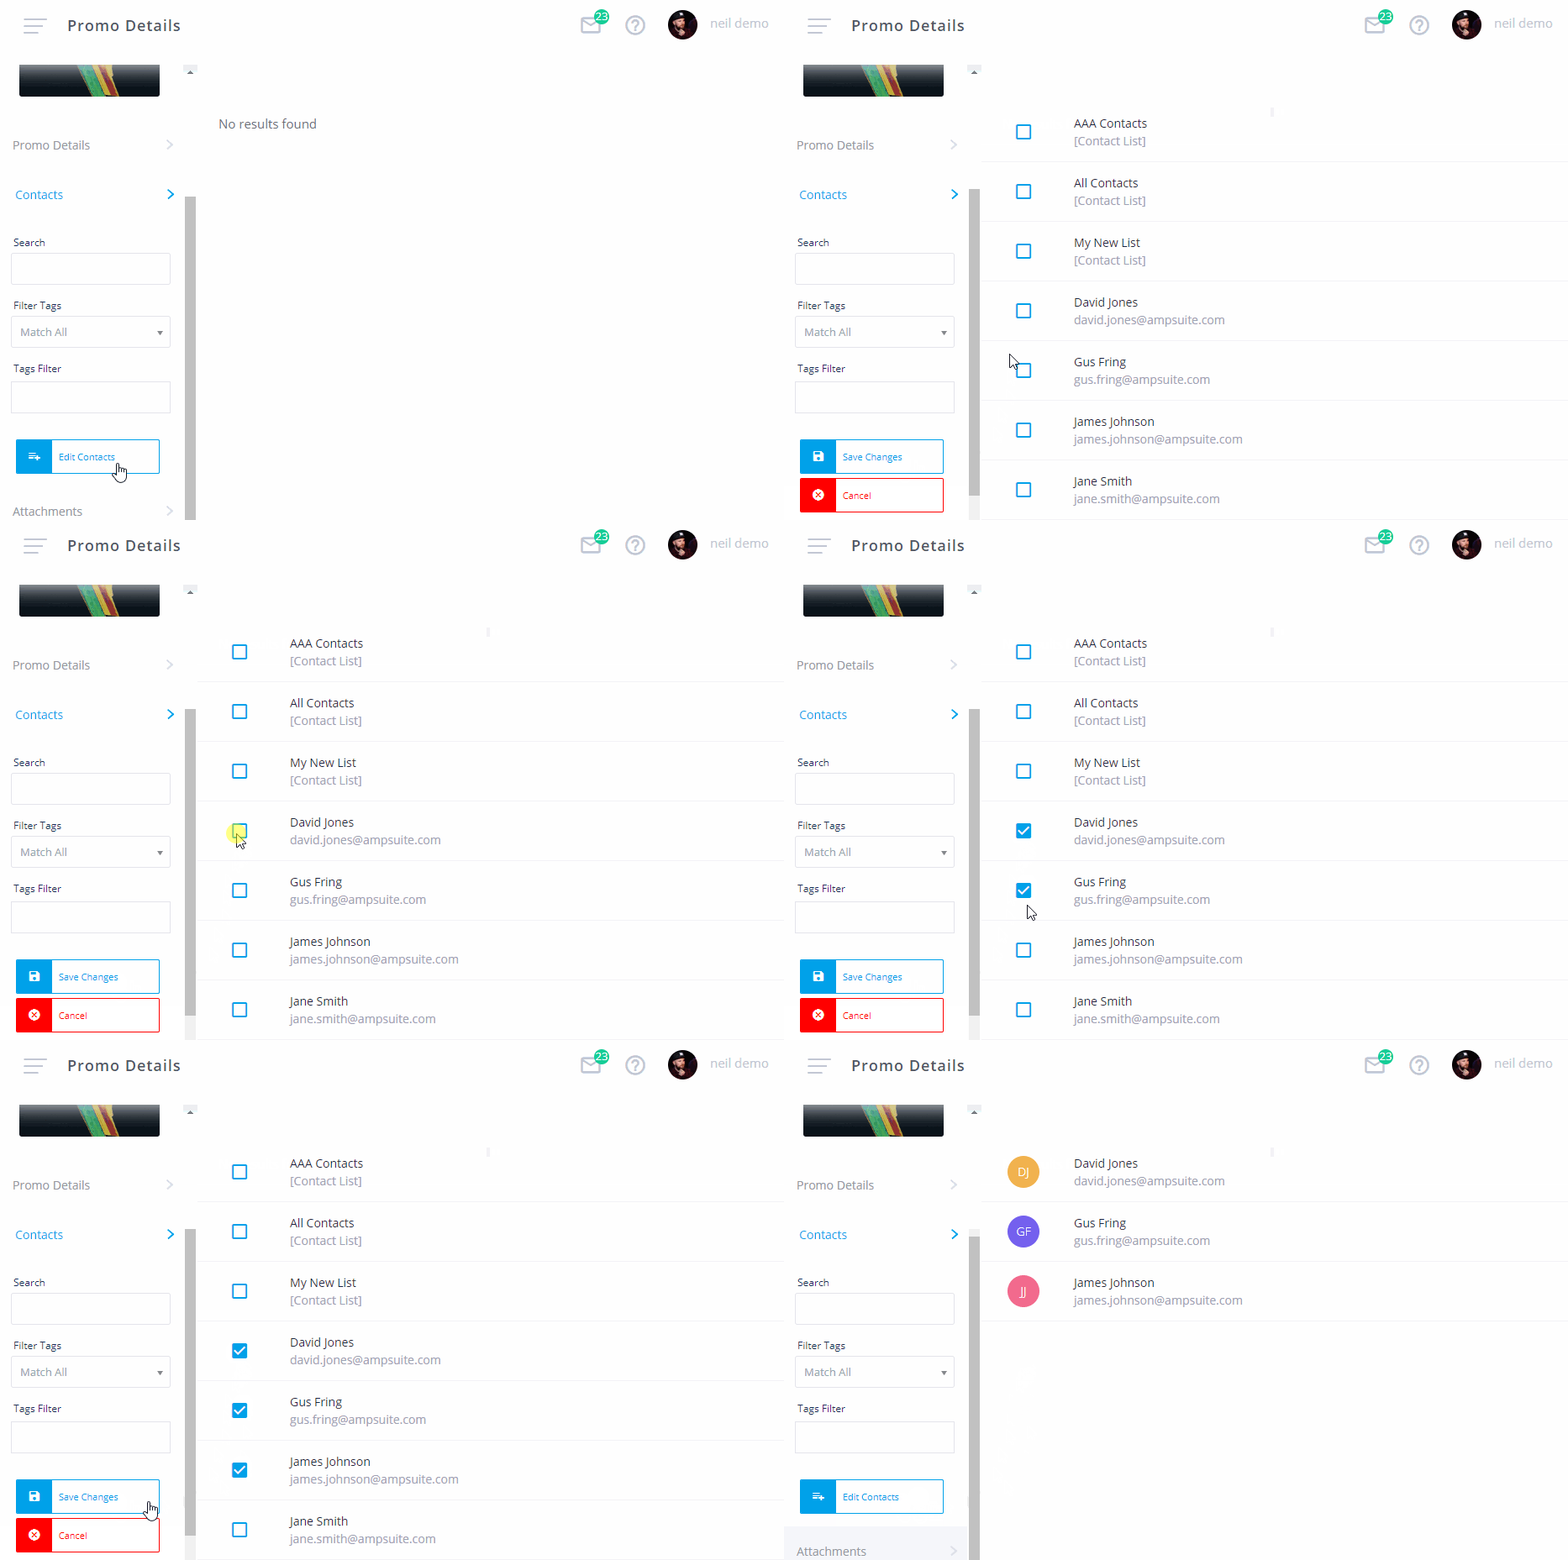
To select which contacts / lists to include simply click the check box to the left of the contact or list - a blue tick will appear to indicate it has been deleted. You can filter the list using the 'Search' and 'Tags Filter' on the left - note that any contacts you have already selected will be remembered even if they are not shown based on the current filters.
Once you have selected all of the contacts you wish to send to, click the Save Changes button on the left - you will now see the right hand side of the screen change to display a list of all of the contacts you just selected. If you wish to make any changes simply click Edit Contacts again and repeat the above steps.
You can remove a previously selected contact by clicking on the checkbox again to remove the blue tick - you must click Save Changes again for any changes you have made to take effect. If you wish to revert back to the last saved list during editing simply click the Cancel button.
Once you are happy with your promo and contact selection, go back to the Promo Details tab and click the Create Promotion button at the bottom of the form - if the start date is set to today it will be sent immediately, otherwise it will be queued until your selected date.
Note: - It is possible to edit some details of previously created promos (including the start date and subject if it has not already been sent) from the Promotions screen - see the 'Edit Details' section of the Promo Feedback help guide page for more information.
Adding Attachments
You can add additional files to include in a promo mailout if you wish (such as press releases) by clicking on the Attachments tab on the left.
Click Add Attachment, select the file you wish to add, and the click Upload File. After uploading the file will appear in the list on the right.
You can remove previously uploaded files by clicking the trash can icon to the right of the filename.