Importing Sales Statements
Select the Import Accounts option from the Accounting section of the main menu. This screen lets you import sales statements from your distribution partners and stores, as well as adjustments using ampsuites adjustments import. Each row in the table here represents to a previously imported sales sheet.
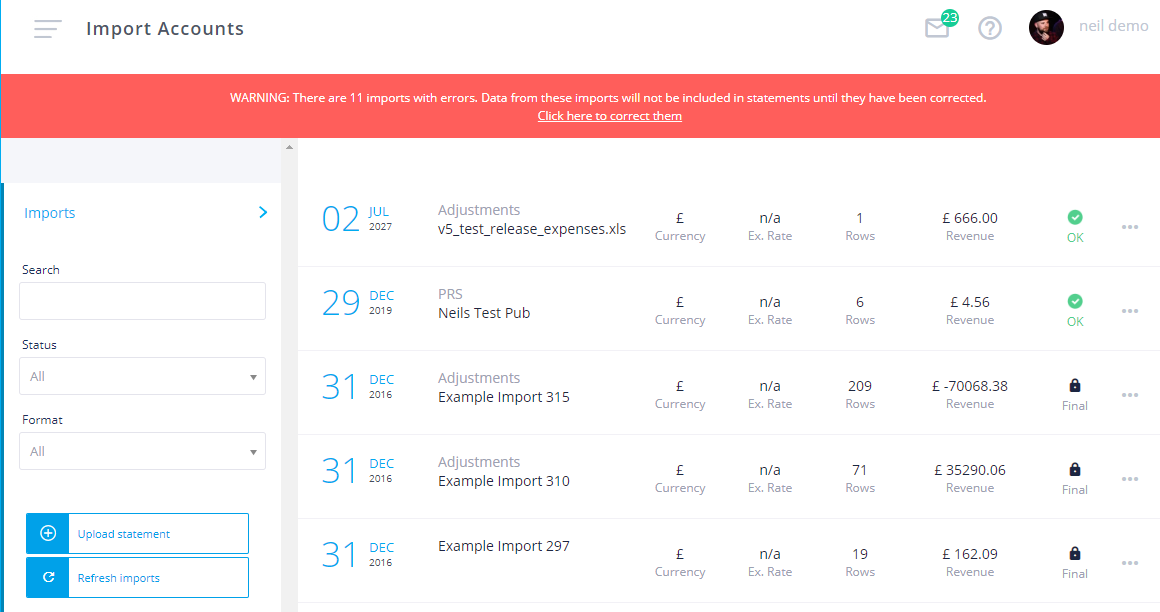
Click on the Upload Statement button to open the import form, here you will be able to upload a sales-sheet for a chosen distributor or store.
- Format - The distributor or retailer this file is from. This is used to detect the file format and headings layout of the file to be imported. If your required distributor is not present please contact your ampsuite representative so that it can be added to your system. We advise against manually editing files into other formats unless we have specifically advised you to do so.
- Statement Date - Select a date to assign data from this file to, this date must be within the date range of the statements you wish to produce. Note that as the quality of date data supplied by retailers varies ampsuite will use this date in statement generation rather than any dates which may be contained within the uploaded file.
- Currency - Select the currency the data in the file is in. Note that all data within a file must be in a single currency. If you select a currency other than your system's default you will be asked to enter an exchange rate.
- File - The sales statement to be uploaded.
Once you have completed the above fields click the 'Import File' button to upload the file and begin processing. Note that depending on the size of the file it may take anywhere between a few seconds and several minutes for the initial upload and processing to take place.
Note : If you have both royalty accounting and publishing enabled you may see an additional 'Publishing Import' tab as well as the usual 'Sales Import' tab.
Importing Adjustments & Expenses
Adjustments and expenses can also be imported using this screen - please see the adjustments & expenses section of the help guide for more details.
Import Errors
Depending on the completeness and quality of your retail partners data (as well as that entered by yourself on ampsuite!) you may find that your imported sales statement contains rows which can not be assigned automatically by ampsuite without some minor manual intervention. The Imported Accounts screen offers several simple ways to fix these issues and in most cases allow them to be automatically fixed on future uploads.
If your import contains errors you will see a yellow 'Errors' symbol on the far right of the row in the table, if there is an issue with the file which prevented ampsuite from reading the data at all (such as incorrect headings / format) it will show a red failed icon instead. If everything is ok and no corrections are required it will show a green OK icon - the 3 different icons are shown in the screenshot below.
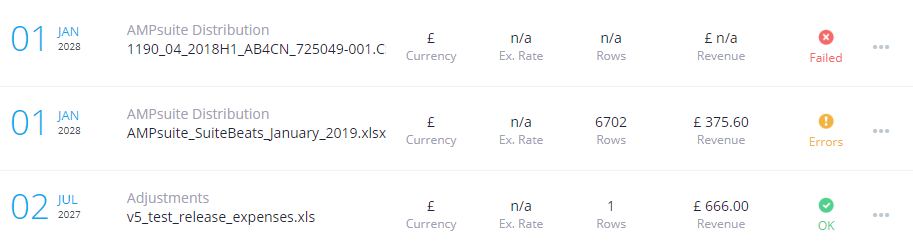
Top Tip: If you have several pages of imports you can easily filter to just see those which require corrections using the 'Status' filter in the left column of the screen.
Red failed imports cannot be corrected and must be deleted and reuploaded once the issue has been found and fixed, double check you have selected the correct format to upload, sometimes distributors / stores make changes to their file formats, in this case contact ampsuite support to update your import to work with the new format.
Imports showing the yellow Errors icon require some manual correction before they can be processed - in these cases click on the row in the list to open up the error correction screen for this file.
Top Tip: We recommend uploading 1 file at a time and correcting all errors on it first before uploading the next file. In this way errors present in previous files that may also appear in subsequent uploads will already have been corrected and will not show up again. If you do not do this you must manually refresh any other files after correcting the previous one for corrections you have just made to be applied to the next file. You should do this and wait for the next file to be refreshed before clicking into the error corrections for it, this will avoid the need to correct the same issues multiple times.
There are 6 main types of error which may need to be fixed, they are:
- Sale Type Errors - The 'Sales Type' identifies the format of the purchase e.g. digital download, streaming, vinyl etc. As each retailer uses their own codes for this you may need to tell ampsuite which format a code relates to if it is the first time it has been present on an import. Most common retailer codes have been preassigned by us. Note, for publishing accounts these codes relate to the type of publishing income, e.g. Performance, Sync, Mechanical etc.
- Release Type Errors - The 'Release Type' identifies if this was a single track sale or a bundle sale. Again codes are retailer specific so you may need to manually assign new codes as they come in. This is imported and ampsuite handles single track and bundle sales differently and incorrect release type assignments may lead to under or over allocation of sales to licensors.
- Territory Errors - If a retailer provides country of sale data and the country code is not recognised you can assign it here. If you are not using territory based contracts and are not concerned with seeing territory specific data within the sales analytics screen you can just set these to 'Unknown'.
- Label Errors - Each sale must be assigned to a label, this prevents misassignment if multiple labels share similar catalog numbers. Unless your system has multiple releases with the came catalog numbers across various labels, these will always be automatically corrected by ampsuite and you shouldn't have to worry about them.
- Track Errors - These occur when an ISRC code in the sales data does not match any of those found on the appropriate release - the code may be either incorrect or blank. These errors can also occur if the track is found but it is not attached to any contract(s) within ampsuite. Note, for publishing accounts these errors are triggered when an unknown Song Code is found, rather than an unknown ISRC.
- Release Errors - ampsuite identifies releases using the catalog number (or Cat. No. for short) of the release (note that although UPC/EAN codes may be used to identify releases on some import formats if catalog number is not available they will still eventually be 'converted' to a catalog number assignment). These errors mean the catalog number for the sales data could not be found under the appropriate label on the system. Sometimes these can also occur if you have more than one release with the same catalog number on a label.
Now you understand the various types of errors that may occur within an import, let's move on to how to correct them.
Sale Type / Release Type / Territory / Label Errors
All the above types of error can be fixed by simply selecting the correct value they relate to from the dropdown menu next to each error displayed in the list.
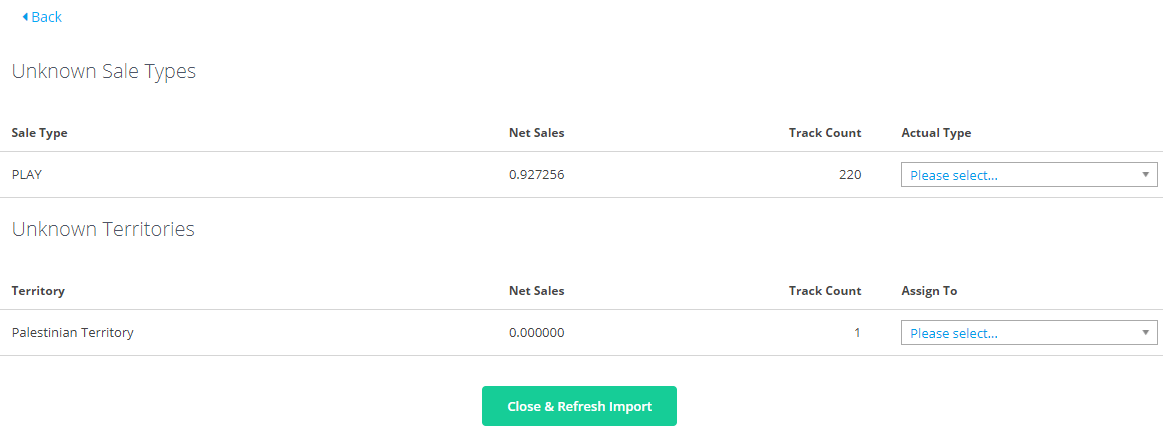
For Label errors you may also choose to 'ignore' those lines of the file in the same way as for track and release errors. You may select 'Unknown' from the dropdown for Territory errors if you are not using territory specific contracts relating to that country and are not concerned with seeing territory specific data within the sales analytics screen.
Fixed Errors
When you have made your corrections click the Close & Refresh Import button at the bottom of the errors list, the associated import will be automatically refreshed. You may find that fixing one set of errors may bring up a new set of errors once the import has refreshed (for example if you have assigned a catalog number to a release but now the ISRC codes do not match any tracks on that release). This is normal and depending on the quality of your data you may need to go through multiple passes of error correction until everything is matched up correctly.
Once all errors have been corrected on an import you will see the yellow Errors icon change to a green OK icon. You can now move on to your next import. Once you have uploaded all your sales statements and they are all showing OK you can move on to creating your statements.
Track Errors
There are two types of track errors 'Unknown Tracks' meaning that the ISRC code could not be found on the relevant release and 'Tracks without Contracts' meaning that the track was found but it was not assigned to a contract. You may see one or both types of error listed in the errors after clicking on the track errors in the previous step.

Unknown Track errors can be fixed by either assigning the sales to an existing track, creating a new track on the system or you may choose to ignore the error if you feel that the sales are not relevant to your accounts. You may sometimes find bundle sales which have been incorrectly picked up as track sales, in this case you can use the mark as bundle option. Tracks without Contracts can be fixed by assigning the track to a contract or by ignoring them in the same way as for Unknown Track errors.
Assign to a Track
Click on the search icon under the 'Assign' column next to the Unknown Track you wish to assign, this will open a new dialog (shown below).
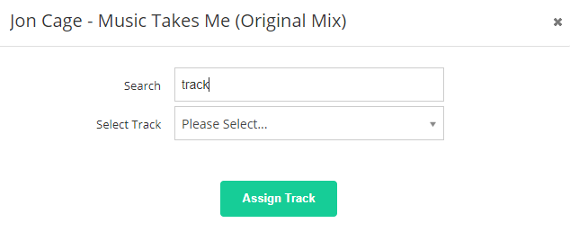
Use the search box to filter the track drop down until you find the corresponding track you wish to assign to - note by default the track title from the sales statement will be populated into the search box, you may need to edit or remove it if the correct track is not displayed. The 'Select Track' dropdown will then update with a list of tracks from matching releases. Select the correct track from the dropdown and click the Assign Track button to assign it.
Create New Track
You can create a new track by clicking the + icon under the 'Create' column next to the error. This will open up the familiar track details dialog as seen on the release creation screen, but with an additional dropdown at the top of the form to select which release to add the track to. Note it is only possible to add tracks to an existing release, if the release does not exist and has not come up in the 'Release Errors' correction you will need to create it as you normally would on ampsuite first.
Make sure all the track details are correct and you have correctly assigned any contracts before saving the track to avoid it coming back up under the Tracks Without Contracts errors section after refreshing.
Mark As Bundle
Occasionally bundle sales will be incorrectly picked up as being individual track sales, you can correct this by clicking the disc icon under the 'Bundle' column heading next to the error you wish to correct. You may find that these errors will reappear under the Unknown Releases errors after refreshing if the catalog number / UPC is not recognised by ampsuite after conversion.
These types of errors can sometimes signify that a previous Release Type error has been incorrectly assigned, it's worth checking previous mappings on the Corrections tab and removing any incorrect ones to avoid this happening again, see the Deleting Previous Corrections section of this help page below for more information.
Ignore Error
You can choose to ignore individual errors by clicking the cross icon under the 'Ignore' column heading. Sales for ignored lines will not be included on statements - you should only do this if you DO NOT wish these sales to be included within your accounts. When an item is ignored the ignore icon will turn red and all other correction options will disappear. You can 'unignore' an error by clicking on the ignore icon again, it will change back to grey and the other correction options will be available once more.
NOTE: Ignored errors are not 'remembered' in the same way as other corrections and only apply to the individual file being corrected, this is to avoid cases where small sales amounts may be ignored in one file which then have more significant amounts imported at a later date from other files.
Assign to a Contract
If a track already exists on the system but it hasn't been assigned to any contract(s) yet it will appear under the Tracks Without Contracts section of the track errors page. Click the + icon under the 'Assign' column heading next to the track you wish to correct, this will open up the familiar track details dialog as seen on the release creation screen. Assign the contracts as required and save the track to correct the error.
Mark As Continuous Mix
Sometimes the reason a track doesn't have any contracts assigned is because it is actually a continuous DJ mix of the other tracks on the release. In this case you can click the icon under the 'Mix?' column heading to mark the track as a continuous mix. In this way all sales for this particular track will instead be equally divided between all other tracks on the release (and then contract percentages for each track applied accordingly).
Release Errors
Release errors can be fixed in one of three ways, you can create a new release if one doesn't exist on the system, assign an incorrect catalog number to an existing release on the system or ignore the error (for example if it is a sale on a label which you are not concerned with accounting to).

Assign to a Release
Your first option to fixing a release error should always be to assign it to an existing release if one exists. Click the search icon under the 'Assign' column heading to bring up the assignment dialog. Note that you should only assign sales to a release which exactly matches the one shown in the sales data - if a release contains extra/different tracks (for example an itunes exclusive) you must create a new version of the release to reflect this or sales may be assigned incorrectly.
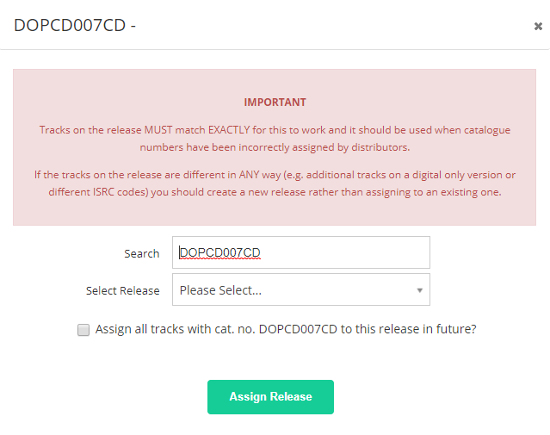
You can search for the correct release to assign to by typing its title or catalog number into the 'Search' box. The 'Select Release' dropdown will update with a list of releases which match your search - select the release you wish to assign the sales to from the dropdown.
If you wish to assign sales for the incorrect catalog number to this release automatically in future tick the 'Assign all tracks with cat. no. to this release in future' tick box before clicking the 'Update' button. Note that if the catalog number within the sales data was blank this option will not be available. You should generally tick this option where it is available, to avoid having to correct this error again in future.
Upon clicking the Assign Release button the dialog will close, you will notice that any errors relating to the incorrect catalog number will now show a tick within the error correction dialog.
Create a new Release
IMPORTANT: You should only create a release if one does not already exist on the system.
Click on the + icon under the 'Create' column of the errors list. This form will open up within which you can enter the basic release details such as the title, catalog number and artist of the release.
There is a second tab to this form titled Tracks (shown below) which will contain all the tracks contained within the imported sales file which match this catalog number. Not that this may not be a complete list and you may need to add additional tracks which are not listed.
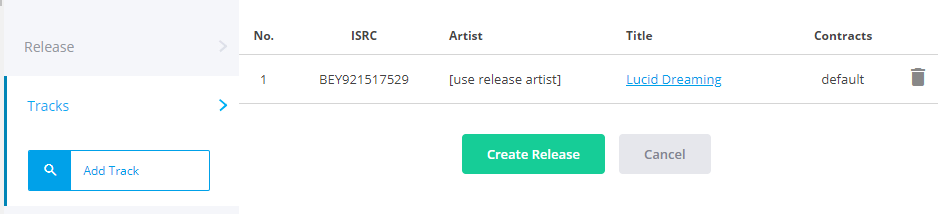
IMPORTANT: Make sure that all tracks for the release in question are added, not just those which happen to appear in this sales statement, saving a release with missing tracks may mean that bundle sales of the release are incorrectly assigned to licensors.
You can edit a track by clicking on the tracks title, this will open up the familiar track details dialog as seen on the release creation screen. Make sure the ISRC code and contract details are correct to avoid bringing up further track errors later on in the process. If you do not edit the tracks - by default all track artists will be set to be the same as the release artist and all contracts will be assigned as if 'Assign to First Licensor' had been selected within the track details dialog.
If an ISRC code for a track already exists on the system on another release you will see a red alert message appear below the track listing within the table, this gives you options to copy the track details from that release as well as the assigned contracts if you so wish.
You can add new additional tracks to the listing by clicking on the Add Track button in the left column.
Once all release and track details have been entered click the 'Create Release' button, you will notice that any errors relating to this catalog number will now show a tick within the error correction dialog.
Ignore the Error
You can choose to ignore individual errors by clicking the cross icon under the 'Ignore' column heading. Sales for ignored lines will not be included on statements - you should only do this if you DO NOT wish these sales to be included within your accounts. When an item is ignored the ignore icon will turn red and all other correction options will disappear. You can 'unignore' an error by clicking on the ignore icon again, it will change back to grey and the other correction options will be available once more.
NOTE: Ignored errors are not 'remembered' in the same way as other corrections and only apply to the individual file being corrected, this is to avoid cases where small sales amounts may be ignored in one file which then have more significant amounts imported at a later date from other files.
Deleting Previous Corrections
You can view and delete previously made corrections by clicking on the Corrections tab of the Import Accounts screen (shown below). This can be useful if you realise you have incorrectly mapped an incoming error or want to check a particular mapping to see where sales have been assigned from the original file.
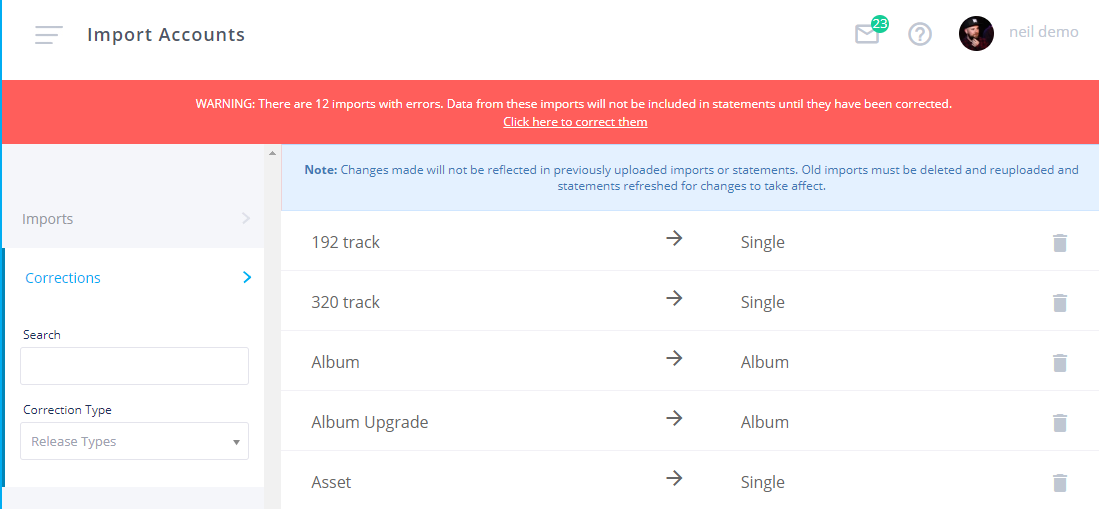
You can filter the list of previous corrections using the Corrections Type dropdown and Search box. The incoming codes from the imported files will be shown on the left hand side of the table, and the item they have been mapped to on the right.
If you wish to delete an incorrect mapping simply click the trash can icon in on the far right of that row.
IMPORTANT: Note that changes made via this screen will not be automatically reflected in previously uploaded imports and their associated statements. In most cases affected imports will need to be deleted and re-uploaded for changes to take effect, after which any statements can be regenerated.
Refreshing Imports
Note that all track and contract assignments for a sales file are 'locked' down once all errors have been removed and it is shown with a tick in the 'Status' column. If changes are made to a contract's percentages or track assignments these will not be reflected in your imported sales data until you have 'refreshed' the import.
You can refresh an individual import by clicking on the ... icon next to the import and selecting 'Refresh Import'. You can refresh all unfinalized imports at once by clicking the Refresh Imports button in the left column.
If an import has already been used within a generated set of statements it will display a 'Final' padlock icon in place of the status icon. If you need to refresh such an import you can 'unlock' it by clicking on the padlock icon first, it will then revert to the standard status icon and you can refresh / delete the import as normal.
Note that after refreshing imports you may find that previously corrected imports may now display errors which will require correction prior to running any statements for that date range.
IMPORTANT: Remember that changes made by refreshing or deleting imports will not be reflected in previously generated statements until the statement run is refreshed.