Contracts
A contract in ampsuite defines the percentage of sales that a licensor receives for a specific track (or set of tracks) based on a number of factors such as the format of the track sold, the territory it was sold in and the store which made the sale. A licensor can have multiple contracts with different settings, and a single track can be assigned to multiple contracts where the sales are to be split between more than one licensor.
Contracts also form the basis of the digital contracting module, in this section we will only cover contracts as they relate to the generation of statements - information about digital contracting can be found in a separate section of the help guide.
Default Contracts
If you find that you are issuing similar contracts regularly, or you have a predefined standard set of contracts which you issue, you may wish to set these up as Default Contracts in order to save time when assigning new contracts to your Licensors.
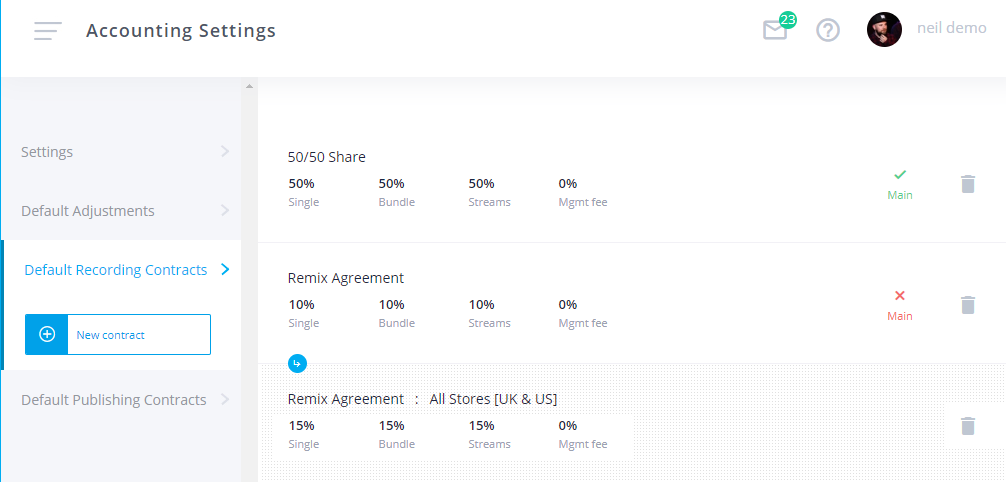
You can set up one or more default contracts from the Accounting Settings screen (select Accounting and then Settings from the main menu) - your default contracts are accessible from the 3rd tab - if you have both the recording and publishing accounting modules on your system you may see two tabs, one for each type.
Main Default Contract
One of your default contracts will be defined as your 'Main' contract - a copy of this contract will be created automatically each time ampsuite creates a new licensor for you, and will be assigned to that licensor as their default contract. Your main contract will be displayed with a green tick next to it under the 'Main' column heading. You can change which contract is set to be your main one by clicking on the red cross next to the contract you wish to change it to.
Note: If your system is set up to account to both labels & artists you can set up a different 'Main' contract for each type of licensor. When you click on a red cross in the main column to select a new main default contract, a popup will appear to allow you to chose if it is to be the main contracts for 'Artists', 'Labels' or a fallback 'Default' (which is used if no specific Artist and/or Label main contract is selected).
If your system is set up to account to only one type of licensor (for example Artists), only one contract can be defined as your main contract at any one time. Note that changing your main contract in the Settings screen does not affect any previously created licensor contracts, only ones which will be created for new licensors from that point onwards.
Creating / Editing Default Contracts
To create a new default contract click the New contract button under the Default Contracts tab in the left hand column, this will bring up the 'Default Contract' dialog for you to complete details of your new contract (see below).
You can make changes to an existing default contract by clicking on its name within the list shown. An explanation of the available fields here are given below.
After clicking to create or edit a default contract the 'Default Contract' dialog will appear. Note that the popup contains 3 tabs, 'Contract Details', 'Contract Text' and 'Data Tags'. For now we will only be looking at the 'Contract Details' tab which defines all the information required for accounting - the other two tabs relate to digital contracting which is covered in a separate section of the help guide.
- Name: Give your Default Contract a unique name, you might want to refer to the terms of this Default so that it can be easily identified when applying to unique Licensor contracts later.
- Reserve Withheld (%): The percentage of moneys withheld as a reserve. If you select a percentage to be withheld, it will be held back in the first accounting period and liquidated during the following period.
- Cross Collaterise: If 'yes', costs (manual and automated) associated with the tracks featured under this contract will be covered with royalties received from other recordings by this Licensor within the same CC group (see 'Cross Collateralisation' below for more details).
- Use PPD:Selecting 'yes' will allow the Published Price to Dealer to be enabled for this contract. This will replace the 'Bundle %' field with a 'PPD Amount' and 'PPD Percentage' options instead.
- Bundle (%): The percentage of royalties to be accounted to the artist for tracks listed under this contract when sold as part of a bundles.
- In House (%): Percentage of royalties accounted back to artist for tracks listed under this contract which are featured on in-house compilation bundles or packages. If your contracts do not provide reduced royalty rates for in-house, first-party compilation releases, the percentage here should be the same as under the 'Single %' field. Releases are set as 'In House' via tick box in the Release builder. Note that when the In House option is used this same % is used for singles, bundles and streaming - overriding all other values on the contract.
- Single (%): The percentage of royalties accounted back to the artist for tracks listed under this contract which are sold as individual units.
- Streaming (%): Percentage of royalties accounted back to the artist for tracks listed under this contract which are streamed on streaming services.
- Management Fees (%): You can set here a percentage to take from royalties received from tracks listed under this contract to go towards a management fee on a percentage basis. This is most often used by label management companies. The percentage is taken from the gross and hidden from the net that goes to your Licensor. Note that if you system is set up to account to both artists AND labels you must make sure that the Management Fees % is set to the same FULL amount on both the label and all of it's artists as these statements run entirely separately from each other and therefore the management fee must be deducted in full from the incoming sales for both sets of statements before the licensors %'s can be applied.
- Update Existing: When you have been using the contract module for some time, you may find that you wish to change some of the terms of your contracts. In order to save you time going back and editing the terms of each individual contract, you can simply update the terms of the Default within this tab to reflect those changes across all previously created contracts. Select 'Yes' here to update all existing contracts which have used this Default to the newly defined terms. Please note that this updating to existing contracts function does not make changes to contracts that have already been signed and agreed with Licensors - it will only make changes to contracts which have not been signed and finalised.
IMPORTANT: If you have made manual changes to individual contracts which are linked to the default originally, these changes will be overwritten when using this option.
Territory / Store Specific Contracts
When editing an existing contract you will see additional options that allow you to select different percentage splits based on whether or not sales happen in a specific store or territory (or combination of the two). Note that you must always set up a base contract that covers all stores and territories first, before you can add store or territory specific exceptions.
Note that in this case a 'store' refers to an individual sales import format which has been set up on your system. Therefore for clients using a single distributor to deliver to all stores (including ampsuite distribution clients) it is not possible to set up store specific contracts.
- Main Contract: If you have selected to create either a store specific or territory specific contract the 'Name', 'Reserve Withheld' and 'Cross Collaterise' fields will be hidden and instead you will be asked to select a 'main contract' that this new contract variation relates to.
- Store: You can choose which retailer this contract is appropriate to. Choose 'All Stores' and it will cover all avenues of revenue received in your accounting. Each store specific contract must be linked to a main 'All Stores' contract to fall back on for all other stores - after creating an 'All Stores' contract you can then add store specific versions by clicking to edit the 'All Stores' version and then changing the dropdown within the popup to select a single store and then completing the other details.
- Territories: It is possible to set up a contract to have different %'s based on the territory of sale (where this information is provided by the retailer and correctly mapped within ampsuite). Rather than working on an individual territory basis ampsuite allows you to set up 'territory groupings'. To create a new grouping click the + icon next to the Territories dropdown - you can then select which territories you wish to be included in the grouping and give it a unique name for future reference. Existing groupings can also be edited from this screen by selecting the grouping from the Territory Group dropdown, to create a new grouping leave the dropdown on Create New Grouping.
IMPORTANT: Territory specific contracts require that you correctly map any incoming territory codes during import error correction, failure to do so may result in incorrect allocation of sales.
Licensor Contracts
Each licensor can have one or more contracts assigned to them, these can either be versions of your previously setup default contracts or ones manually created which are specific to the licensor. You can view all contracts assigned to a licensor via the licensors screen. Click on the licensor you wish to view / edit - their contracts can be accessed by clicking on the 2nd tab (see screenshot below).
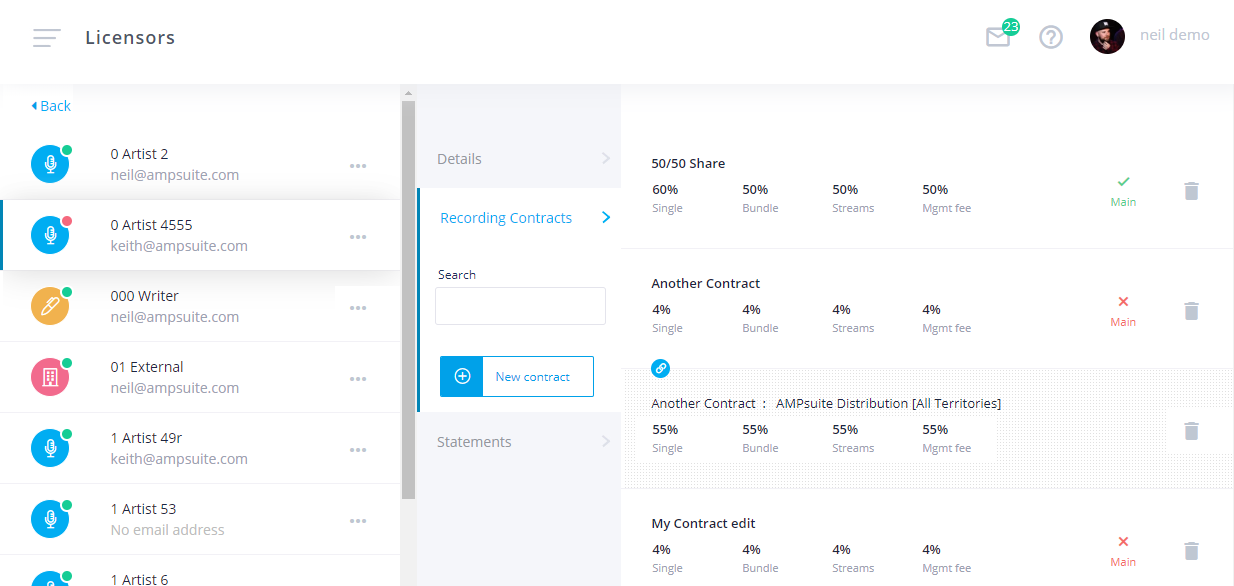
The main contract for this licensor will be displayed with a green tick in the Main column, this is the contract that all tracks linked to this licensor will be automatically assigned to based on your Settings. You can select another contract to be the main by clicking on the red cross next to it.
You can delete a contract by clicking the trash can icon on the far right of the contract. All currently assigned tracks will be removed from the contract - this will only affect statements and sales imports if they are refreshed. All unassigned adjustments will be lost. If you delete a licensors main contract you should remember to assign one of their remaining contracts to be the new main.
To edit an existing contract simply click on it from within the displayed list, to create a new contract click the New Contract button in the left hand tabs column.
You will notice that the Edit Contract form is extremely similar to the Default Contract form we looked at earlier - please refer to the Contract Details section above for details on how to complete these fields.
Cross Collateralisation
Cross Collateralisation allows income from one licensor contract to offset costs on another contract belonging to the same licensor. If 'Cross Collaterise' is yet to Yes, a new dropdown appears to select which other contract(s) this one should be Cross Collaterised with. If you have not yet set up a CC group select 'Create New Group' - once a CC group has been created, you can add other contracts to it by editing them, setting 'Cross Collaterise' to Yes, and selecting this contract from the CC with dropdown.
If Cross Collateralisation is set to no, only income from that specific contract will be used to offset expenses associated with it. Individual negative balances for each contract (or CC group) will be carried forward to the next statement period, even if the overall positive balance of other contracts on the statement results in a payout.
Additional Tabs
As well as the Details tab, a number of other tabs with options relating to the selected contract will be shown, these will be explained in more detail elsewhere but include the following:
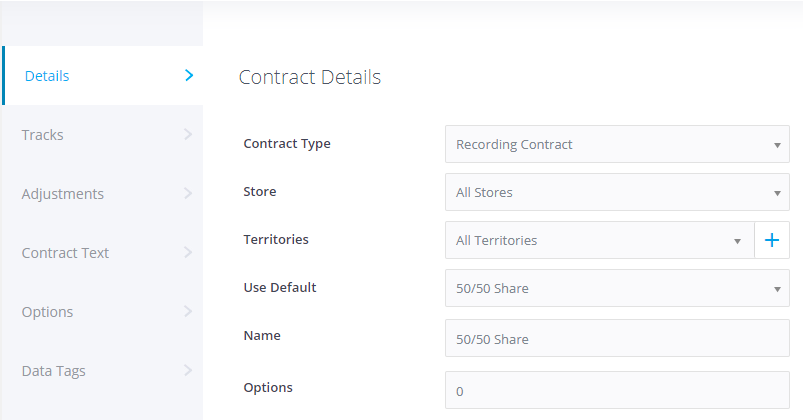
- Tracks: View, assign and remove tracks from this contract - see the Assigning Tracks section further down this page for more details.
- Adjustments: Expenses and manual adjustments assigned to this contract can be viewed and edited here, see the Adjustments & Expenses section of the help guide for more information.
- Contract Text: The text of the agreement which can be sent to the licensor for them to digitally sign via the digital contracting module.
- Track Details: The track details as displayed within the contract text to be signed by the licensor (not to be confused with 'Tracks' above - which shows the tracks associated with this contract for accounting purposes). See the digital contracting part of the help guide for more information.
- Data Tags: Can be used to automatically pull information about the licensor in to the contract text of a digital contract, see the digital contracting part of the help guide for more information.
Assigning Tracks
Once you have set up your desired contract splits for your licensors it is then possible to assign one or more tracks to each of their contracts. Sales for these tracks will then be assigned to this licensor's statement, with the percentages defined in the contract applied to them.
IMPORTANT: It is possible for an individual track to be assigned to as many contracts as you like (including more than one contract of the same licensor). Note that all contract percentages are applied independently of each other, so adding a track to an additional contract does not reduce the percentage share of the track on any existing contracts it is already assigned to. As such you must make sure to adjust the percentages on each contract accordingly when splitting sales between multiple licensors. For example if you have two artists each assigned the same track to a 50% contract on each, the total sales allocated would be 100% (i.e. the label wouldn't receive any share of the money) - it is more likely they should have been adjusted to 25% each to account for the multiple licensor splits being applied.
You can assign a track to a contract in one of two ways, either from within the Edit Release screen, or from the Licensors screen. We will cover both below, which is best will depend on the situation, we would generally recommend editing contracts for a specific track from within the release, as you can then see an overview of all contracts currently assigned to the track. However, editing assignments from the Licensors screen can also be useful sometimes, for example when making bulk changes to a licensors assignments, such as moving all tracks from one contract on to another.
Method 1: Edit Release / Track
*For most new users and those less familiar with the ampsuite system, we recommend using our "Quick Contract" method of assigning contracts at Track level. See separate section of the help guide here for our guide to assigning Quick Contracts, or continue reading below for alternative methods.*
To edit a tracks contracts from within a release, first click in to edit the release from the View Releases screen by hovering over it and clicking Edit. Next click on the Tracks tab, and then click on the track you wish to edit. This will open the Edit Track dialog - click the 3rd tab down labelled Contracts (or Recording Contracts if you have both the recording and publishing modules enabled) as shown in the screenshot below:
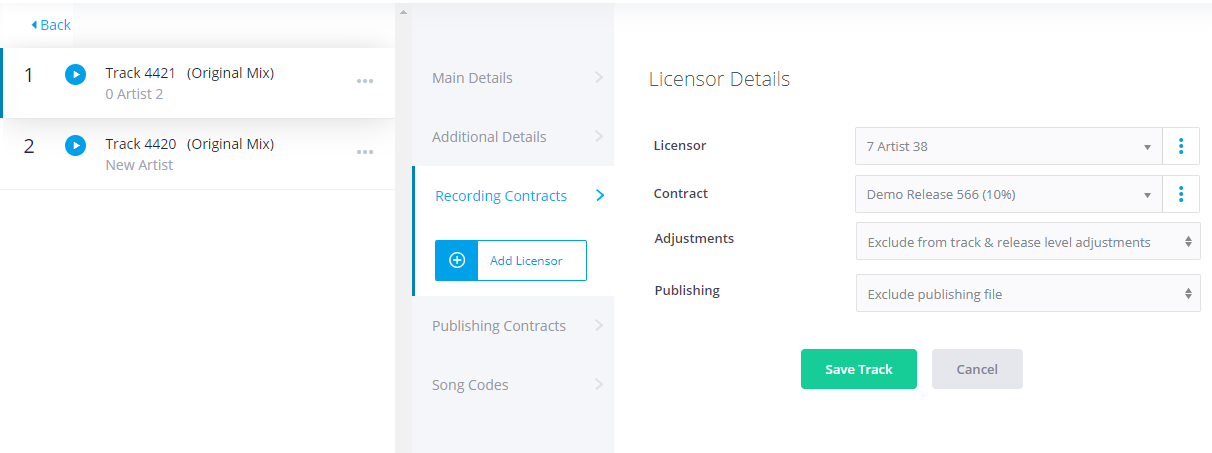
The right hand side of the screen shows information relating to the current contracts assigned to this track. For each contract you will see a number of dropdowns, these are:
- Licensor: The licensor this track is assigned to
- Contract: The specific contract of the above licensor this track is assigned to
- Adjustments: It's possible to exclude a particular track from track and release level adjustments / expenses. If this is selected and track / release level adjustments (such as default expenses - or those imported via the adjustments import) will be split between all remaining contracts on the track, as if this contract did not exist. This may be useful if for example an expense should only be recouped from the original artists of a track, and you wish to exclude a remixer who is also assigned to the track, but should not have the expense recouped from their share of royalties.
- Publishing: If you are using the ampsuite publishing service, you can select here if this contract should be included in the publishing details that are sent to us when delivering the release. Only contracts where the licensor has a writing credit for the track and you control their publishing should be included.
The above details related to a single licensor / contract assigned to this track. It is possible to assign more than one licensor / contract to a track, to add another click the Add Licensor button on the left under the Contracts tab. A new Licensor Details section will appear on the right hand side, you can then select the Licensor and Contract you wish to add this track too using the dropdowns as described above.
You can remove additional licensors / contracts you no longer wish to be assigned to a track by clicking the ... icon to the right of the Licensor dropdown, and selecting Remove Licensor. Note it is not possible to remove the first set of licensor details, as a track should always be assigned to at least one licensor / contract.
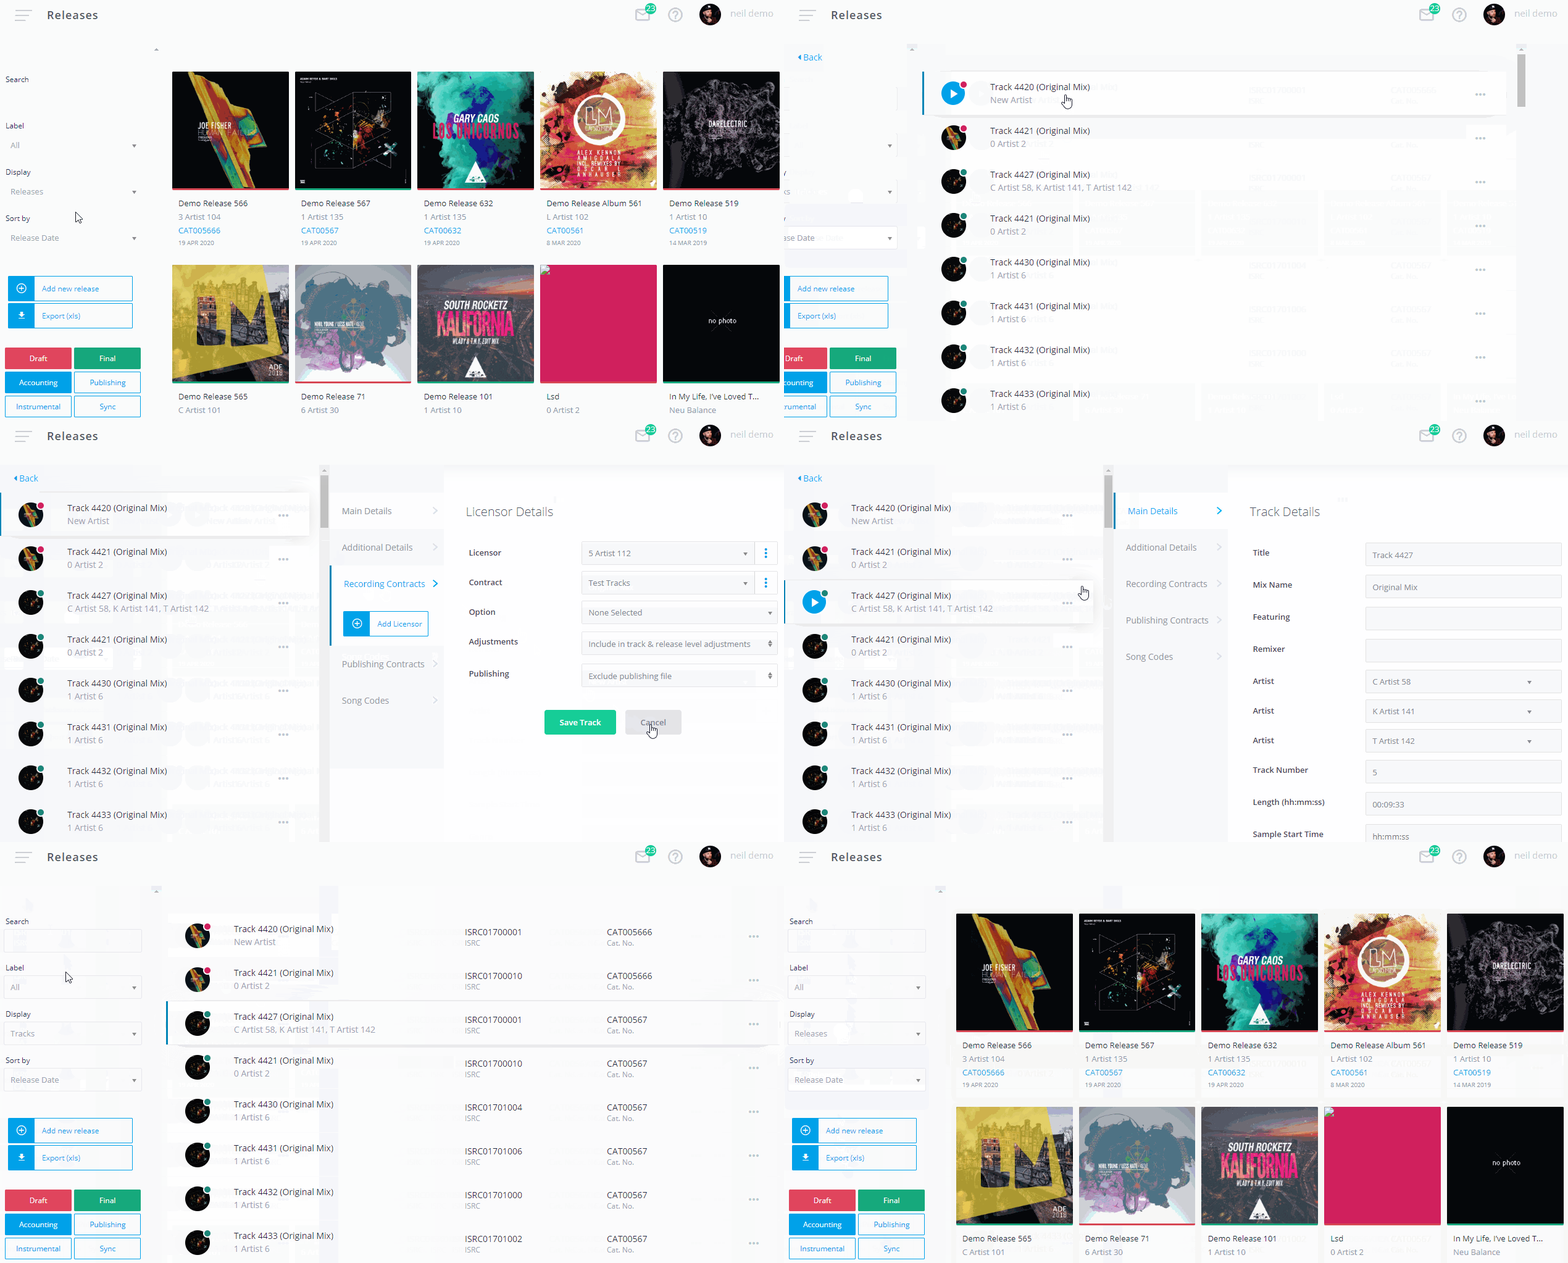
The video below shows the process of adding (and then removing) an additional licensor from a track:
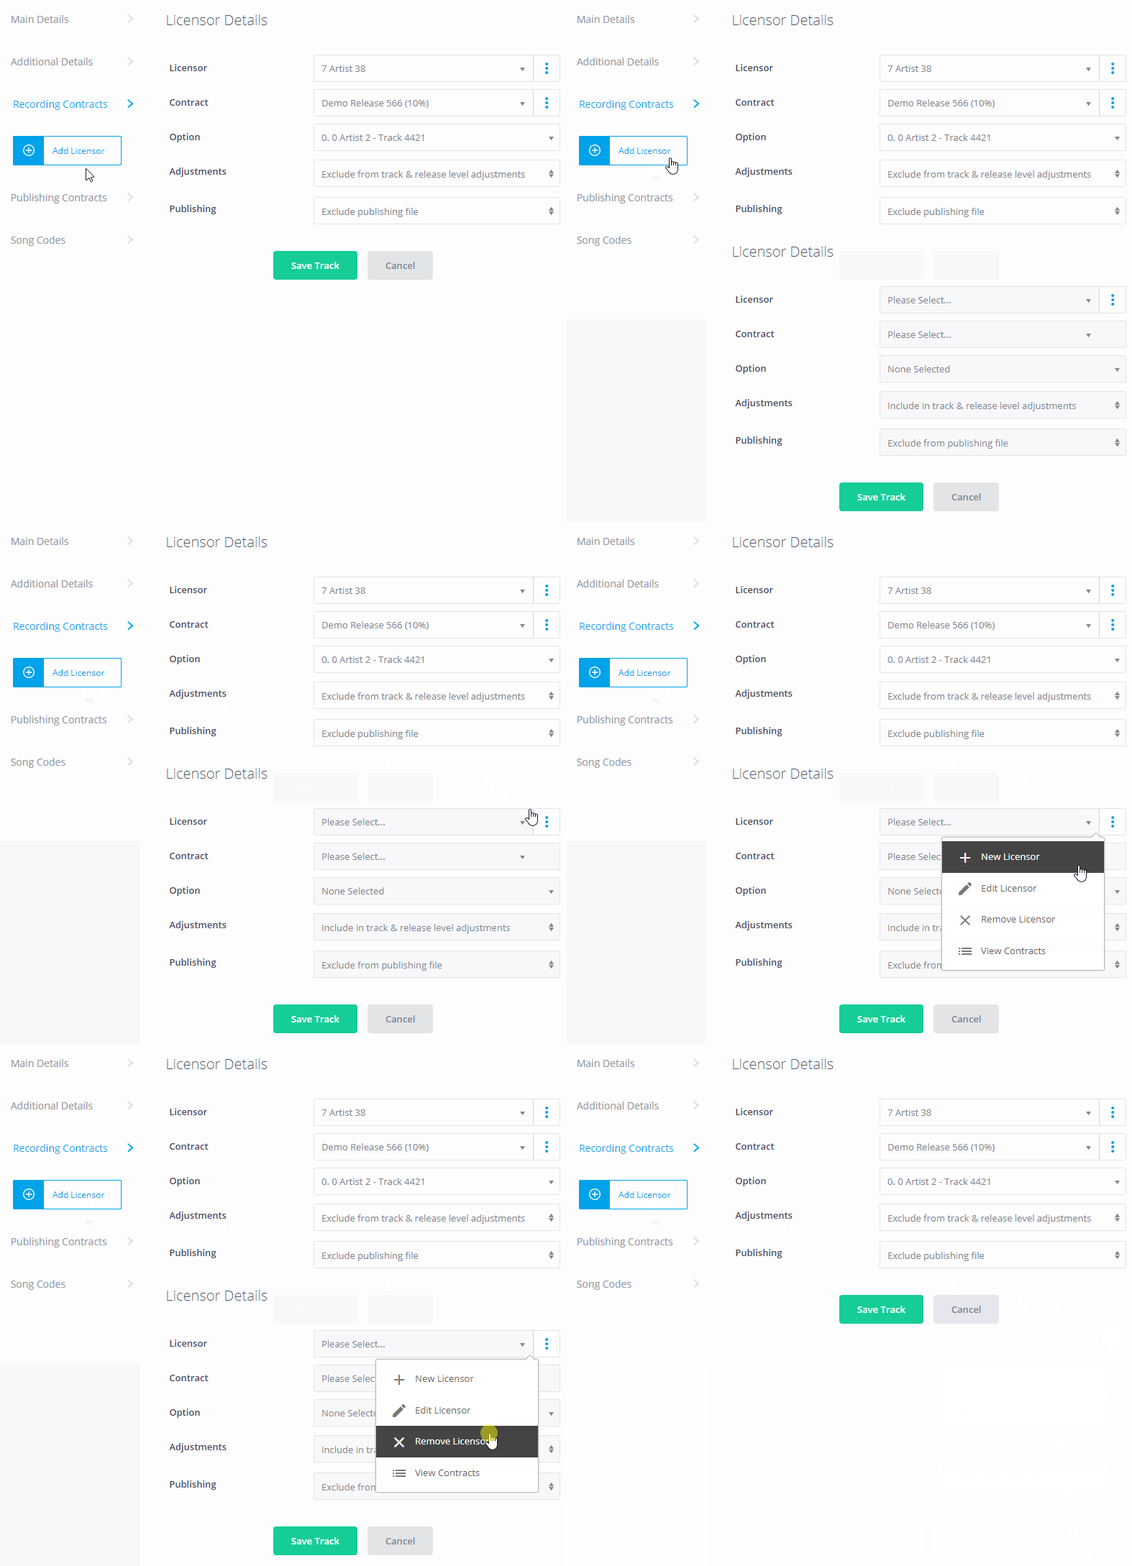
Using the ... buttons next to the Licensor and Contract dropdowns it is also possible to quickly perform other actions such as creating a new licensor or contract, all from within the Edit Track view.
IMPORTANT: Any changes made above will not be saved until you click the Save Track button at the bottom of the page. If you wish to discard any changes you have made and start again click the Cancel button to close the dialog, you can then click back in to the track and start again.
Assign to First Licensor
By default all new tracks will have the Licensor and Contract options set to Assign to First Licensor and Assign to Default Contract - as shown in the screenshot below:

If left like this the track will be assigned based on the Default Licensor Type as defined in your accounting settings - for example if this is set to 'Artist' the track will be assigned to the main contract of the first artist listed under the track meta data details.
IMPORTANT: This auto assignment only ever assigned the track to a single licensor, if a track has multiple artists listed in the meta data only the first listed artist will be assigned. If you require a track to be assigned to multiple contracts you must do this manually.
NOTE: The first listed licensor must have a main contract selected for auto assignment to work. If no main contract is selected for a licensor, then auto assignment will not be possible, and the track will remain unassigned.
NOTE: The actual licensor and contract will be assigned to the track as soon as the Save Track button is clicked with the 'Assign to First Licensor' option selected. This means any changes to the artist (or label) in the meta data will not update the selected licensor / contract. You must manually change the licensor if you make changes to the meta data which must also be reflected in the contract assignments.
Method 2: Licensors Screen
If you wish to make changes to contracts at a licensor level, rather than for a specific track or release, then this might be better achieved from the licensor screen.
To edit the track assignments under a particular contract first click on the licensor, then the contract you wish to edit, and select the Tracks tab
Initially this will display a list of all the tracks already assigned to this contract, or a blank list if no tracks are currently assigned. You can add or remove tracks from the contract by clicking the Edit Tracks button, as shown in the video below:
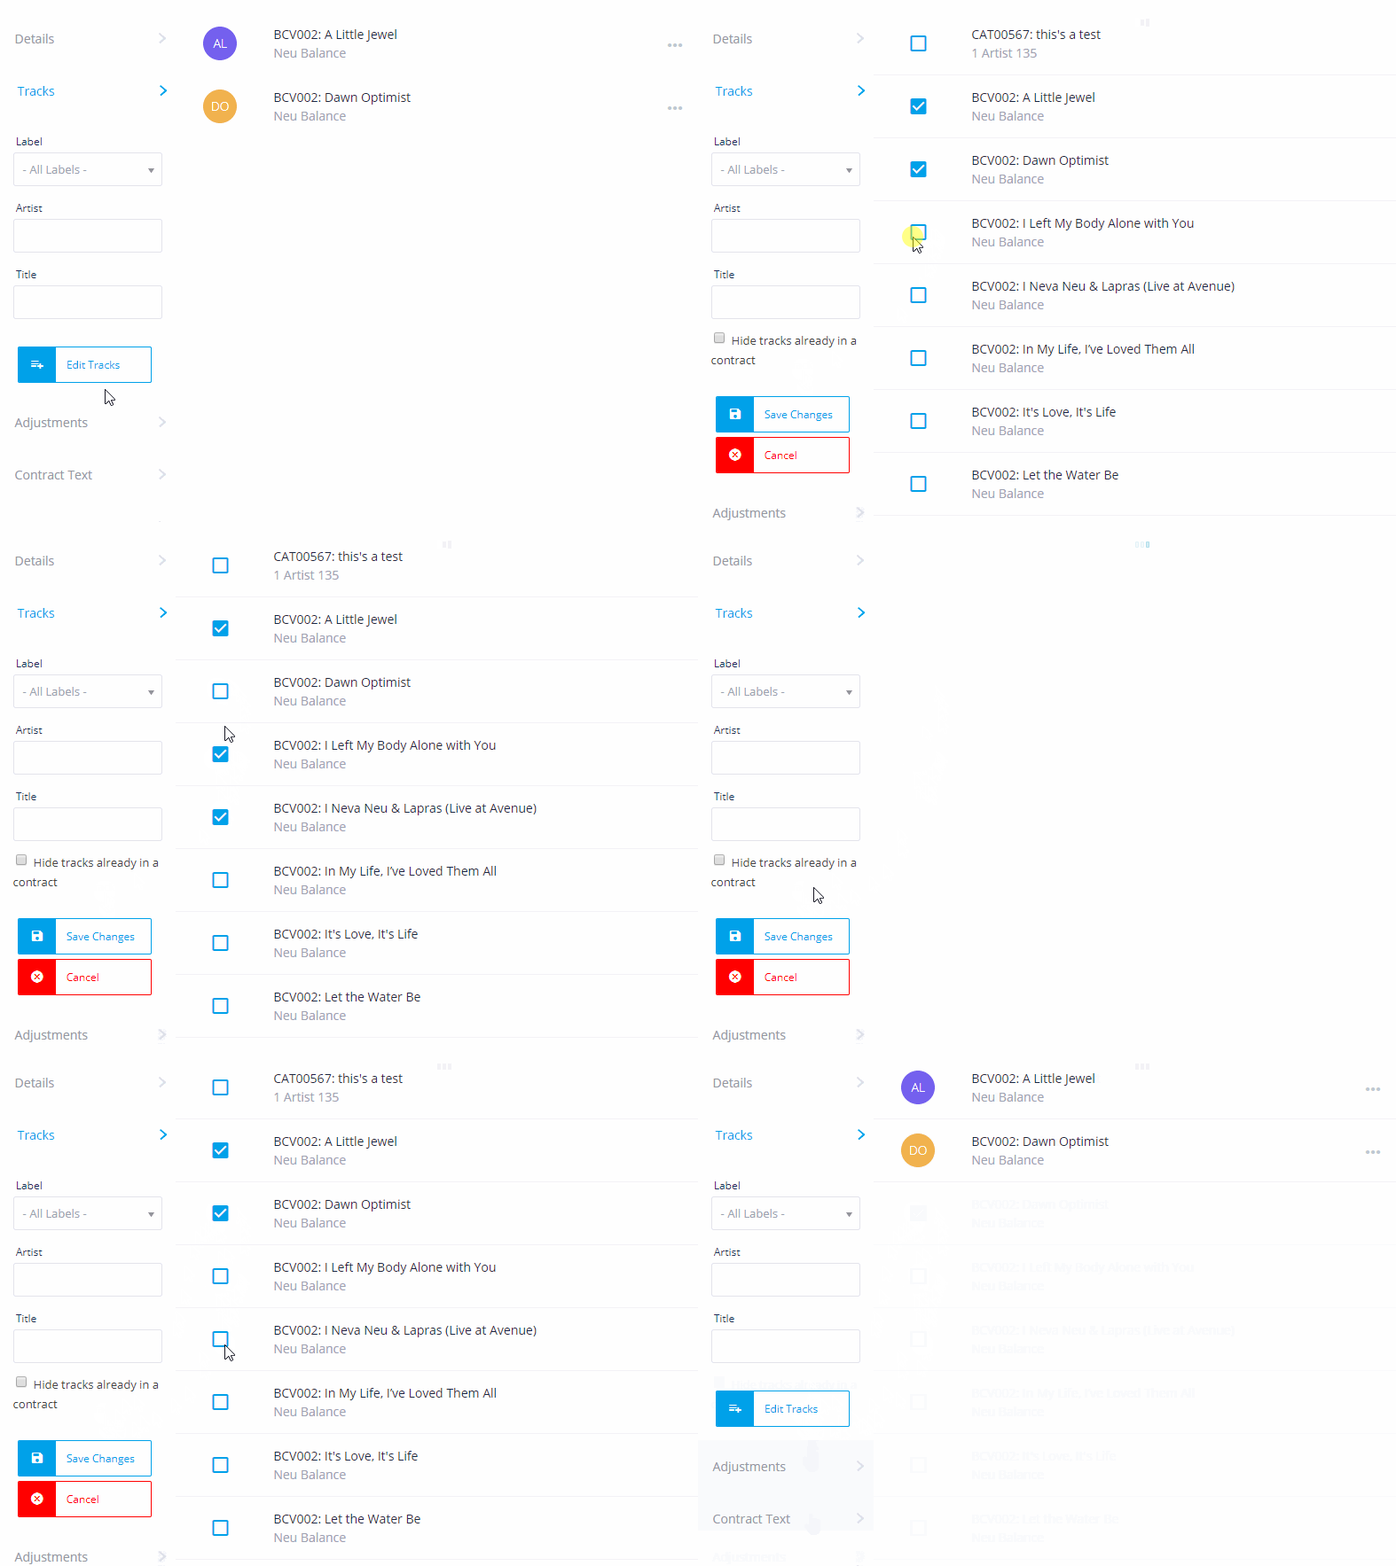
One in edit mode, you can add or remove tracks by clicking on the checkbox to the left of the track. Note that in edit mode the list will show every track available on your system, with the filters in the left column applied. As such you may not see all currently selected tracks, however your selections will be remembered even when they are not shown due to the current filter options. You can remove a currently assigned track by removing the tick in the checkbox next to it.
You can select the Hide tracks already in a contract filter to only show tracks which are not currently assigned to any contract, this is a quick way to check that all tracks have been assigned to at least one contract ready for accounting.
Once you are happy with your selection click the Save Changes button - the list will revert to show the updated list of tracks which are actually assigned to the contract. If you wish to abandon any changes you have made and revert to the previously assigned tracks, click the Cancel button.
You can delete tracks currently assigned to a contract by clicking the ... icon to the right of the track and selecting Remove Track - this may be quicker than using the Edit Tracks option above if you only wish to remove a handful of tracks from the contract.
Method 3: View Releases Screen
Another handy way to edit contracts on a specific track is via the Tracks view on the View Releases screen. Simply change the Display type to Tracks (as shown in the video below). You can now quickly click into any track shown to view and edit it's contracts. You could for example filter this list to tracks by a specific artist, and then quickly click through each of their tracks to check and make changes.